


How to Layer Your Skincare Products
“Do I apply facial oils before or after moisturizer? "Should I put on my serums or eye care first?" What about spot treatments?"
We get asked about product layering all the time, so let’s settle it once and for all. The order in which you apply skincare products is directly related to how your skin is going to absorb them. To truly get the full benefits of your products, there is a rule of thumb: apply your skincare from thinnest to thickest. That means liquid-y products, like toners and serums, come first and oil-based, creamy, whipped products are applied last.
HOW MANY SKINCARE PRODUCTS DO I NEED?
The answer to this question is completely dependent on your skin type, concerns, and preferences. Sensitive skin types may prefer less, while aging and acne-prone complexions may want to use more.
If you prefer to keep things simple (skin minimalism anyone?) stick to these three basics daily: cleanser, moisturizer, and sunscreen.
HOW TO LAYER SKINCARE
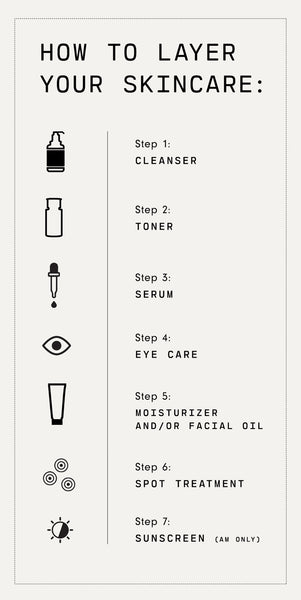
STEP 1: CLEANSER
Whether you’re looking for a clean slate to start your day or to remove your makeup at the end of it, wash up with your favorite cleanser. Opt for one that is pH-balanced and free of sulfates, soaps, and detergents (like the Antioxidant Cleanser or Gentle Cycle), which can strip skin's natural oils and create that uncomfortable squeaky clean feeling. For acne-prone skin, use one made with salicylic acid like Keep the Peace. Or, if you wear makeup, double cleanse.
STEP 2: TONER OR ESSENCE
Use a toner, like Baby Cheeks, to restore the skin’s pH, remove hard water residue, and replenish skin. The water-like consistency of toner penetrates quickly and preps your skin for the rest of your regimen.If you're into chemical exfoliation, Weekend Glow is a great option to use here. Similar to a toner, essence can be applied after cleansing as well. Stemming from Korean beauty, an essence is a lightweight booster that delivers a dose of hydration before the rest of your routine.
STEP 3: SERUM
Serums are packed with active ingredients that target specific concerns. For best penetration, apply while skin is still slightly damp from the toner. During this step, really take the time to pat the product in with your hands or a facial roller. You can also add in a booster, like a couple drops of hyaluronic acid or a shake of Vitamin C Powder, to, over, or under a serum (just follow that thinnest to thickest rule). Regardless, always wait 2-3 minutes for serums to sink in before moving onto your next step.Mixing serums? Read our guide to ingredient layering first.
STEP 4: EYE CARE
As you may know, the skin around your eyes is the thinnest on your body—meaning your eyes can easily show signs of dark circles and bags. Once serums have absorbed, focus on the eye area with your favorite eye gel, balm, or cream.STEP 5: MOISTURIZER AND/OR FACIAL OIL
Seal your routine in with a moisturizer. Moisturizers are usually thicker in consistency because they are designed to absorb slower than your other products—this helps to lock in the moisture and protect your skin. You may use something lightweight, like Dew Point, in the AM and opt for a night cream during the PM.
If you use facial oils, layer on top of or use instead of moisturizer. Psst: Since our Sunday Morning Oil-Serum is a hybrid, you can use it as a replacement for your oils and serums or, if you're extra dry, layer beneath or on top of your moisturizer.
STEP 6: SPOT TREATMENT
When it comes to spot treatments you have two options. Moisturize first, avoiding the area of concern, then spot treat. Or spot treat first, let it sink in, and add a light layer of moisturizer on the affected area. Depending on the area's size, one way may work better for you than the other.
For pimples, use an Acne-Drying Treatment to suck out excess sebum and unclog pores.
You can spot treat dark spots, too. Use Out of Sight to target areas of hyperpigmentation and uneven tone.
STEP 7: SUNSCREEN
And finally, let’s not forget to protect our skin from the sun (every single day, all year round). Applying sunscreen should be the last and final step in your AM skincare routine. The AAD recommends choosing SPF 30 or higher with broad-spectrum protection to ward off both UVA and UVB rays. Our Daily Mineral Sunscreen protects against environmental and electronic pollution (like screen time), too.WEEKLY: EXFOLIATE
Regular exfoliation is important for unclogging pores (and reducing their appearance), preventing breakouts, brightening tone, and evening out texture. But too much exfoliation can worsen existing concerns. Aim to exfoliate around 1x per week using a scrub, like Day Maker, or an At-Home Dermaplaning Tool. For both, apply on clean skin after cleansing, toning, and/or removing makeup and sunscreen but before applying serums.
OPTIONAL: MASKS AND PEELS
These targeted treatments can work their way into your rotation typically 1-3 times a week. For wash-off masks and peels, use after cleansing and toning but before applying your serums. For leave-ons, like The Shortcut, apply after serums or simply on freshly cleansed skin.
OPTIONAL: LIP AND BODY CARE
The back, legs, shoulders, knees...they all have skin concerns, too. Post-shower (or after a sweaty workout) is a great time to spritz on our Acne-Control Body Mist. If you're more focused on moisture or aging skin, consider a Body Oil or Retinol Body Lotion, too. (If you're layering both, remember: moisturizer first, oil second.)
As for parched and chapped lips, swipe on a Conditioning Lip Oil whenever your lips need some extra TLC. Get a fully-stocked routine by shopping our Best of Versed Gift Set (or make your own through our Skin Decoder quiz).